문서 자동화
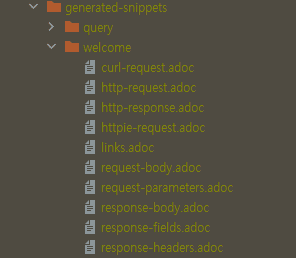
API 서버를 다룬다면 생성한 API를 클라이언트들이 사용할 수 있도록 관련 명세를 문서화하는 것이 필요하다. 물론, 별도의 편집기로 직접 작성을 할 수도 있지만 이를 스펙이 변할 때마다 지속해서 최신화하고 품질을 유지하는 것은 결코 쉬운 일이 아니다. 그래서 이러한 문서들을 코드 레벨에서 자동 생성할 수 있는 도구들이 존재하는데 스프링 진영에서 많이 사용되는 것은 Spring Rest Docs와 Swagger이다.
Spring REST Docs
Spring REST Docs 는 RESTful 서비스에 대한 문서 스니펫을 자동 생성 할 수 있다.
Spring MVC라면 MockMvc를 기반으로하는 테스트 프레임워크,
Spring WebFlux라면 WebTestClient,
Rest Assured 3 등을 기반으로 스니펫을 만들어낸다.
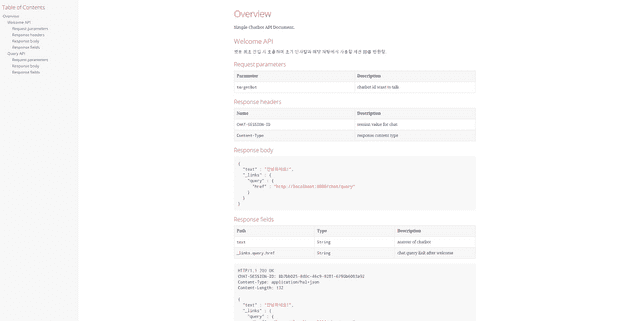
그리고 작성한 문서 템플릿이 생성된 스니펫을 참고하여 최종 문서를 생성한다. 디폴트로는 Asciidoctor로 만들어진 HTML을 문서를 생성한다.
Build Configuration
gradle 프로젝트에서 REST Docs를 사용하기 위한 기본적인 빌드 설정은 아래와 같다.
plugins {
  // Asciidoctor 플러그인 설정
  id 'org.asciidoctor.jvm.convert' version '3.3.2'
}

configurations {
  asciidoctorExt
}

dependencies {
  asciidoctorExt 'org.springframework.restdocs:spring-restdocs-asciidoctor'
  testCompile 'org.springframework.restdocs:spring-restdocs-mockmvc'
}

ext {
    snippetsDir = file("build/generated-snippets")
}

test {
  useJUnitPlatform()
  outputs.dir snippetsDir
}

asciidoctor {
	inputs.dir snippetsDir
	configurations 'asciidoctorExt'
	dependsOn test
}

bootJar {
  dependsOn asciidoctor

  // jar 내부로 카피
  from("${asciidoctor.outputDir}/html5"){
    into "static/docs"
  }
}
Snippet 생성
이후 API에 대한 스니펫을 생성하기 위한 코드를 작성한다. 스니펫의 디폴트 생성 위치는 빌드 도구에 따라 달라진다.
| Build tool | 생성 파일 위치 |
|---|---|
| Maven | target/generated-snippets |
| Gralde | build/generated-snippets |
mockMvc를 사용한 테스트 코드 이 후 마지막에 작성된 document("welcome") 을 통해 스니펫을 생성할 수 있다. 이는 기본적으로 request, response body에 대한 정보를 포함하고 header, parameter, hypermedia, constraint 등을 필요에 따라 정의하면 된다.
@ExtendWith(SpringExtension.class)
@SpringBootTest
@AutoConfigureMockMvc
@AutoConfigureRestDocs
class ChatControllerTest {
    @Autowired
    private MockMvc mockMvc;

    @Test
    void welcome() throws Exception {
        mockMvc
                .perform(
                RestDocumentationRequestBuilders
                        .get("/chat/welcome")
                        .param("targetBot", "song-chat-service")
                )
                .andDo(print())
                .andExpect(header().exists("CHAT-SESSION-ID"))
                .andExpect(header().string(HttpHeaders.CONTENT_TYPE, MediaTypes.HAL_JSON_VALUE))
                .andExpect(status().isOk())
                .andExpect(jsonPath("text").exists())
                .andExpect(jsonPath("_links.query").exists())
                .andDo(document(
                        "welcome",
                        requestParameters(
                                parameterWithName("targetBot").description("chatbot id want to talk")
                        ),
                        responseHeaders(
                                headerWithName("CHAT-SESSION-ID").description("session value for chat"),
                                headerWithName(HttpHeaders.CONTENT_TYPE).description("response content type")
                        ),
                        responseFields(
                                fieldWithPath("text").description("answer of chatbot"),
                                fieldWithPath("_links.query.href").description("chat query link after welcome")
                        ),
                        links(
                                linkWithRel("query").description("chat query link after welcome")
                        ))
                ));
    }
}
API 명세 이외에도 문서에 대해 PreProcessor를 지정할 수 있다.
아래 예시는 prettyPrint()를 통해 생성되는 스니펫 내부의 JSON 등의 포맷을 읽기 쉽게 포맷팅 해준다.
빈을 생성하고 테스트 클래스에 @Import(RestDocsConfiguration.class) 어노테이션을 지정하면 설정이 적용된다.
@TestConfiguration
public class RestDocsConfiguration {
    @Bean
    public RestDocsMockMvcConfigurationCustomizer restDocsConfigurationCustomizer() {
        return configurer -> configurer
                .operationPreprocessors()
                .withRequestDefaults(prettyPrint())
                .withResponseDefaults(prettyPrint());
    }
}
템플릿 작성
생성 문서의 템플릿을 나타내며 이를 따라 스니펫들을 조합하여 실제 문서가 생성된다. 이 때 템플릿의 디폴트 위치는 빌드 도구에 따라 달라진다.
| Build tool | Template 위치 | 생성 파일 위치 |
|---|---|---|
| Maven | src/main/asciidoc/*.adoc | target/generated-docs/*.html |
| Gradle | src/docs/asciidoc/*.adoc | build/asciidoc/html5/*.html |
:doctype: book
:icons: font
:source-highlighter: highlightjs
:toc: left
:toclevels: 4
:sectlinks:
:operation-curl-request-title: Example request
:operation-http-response-title: Example response

[[Overview]]
== Overview

Simple Chatbot API Document.

[[welcome]]
=== Welcome API

챗봇 최초 진입 시 호출하며 초기 인사말과 해당 채팅에서 사용할 세션 ID를 반환함.

operation::welcome[snippets='request-parameters,response-headers,response-body,response-fields']

[[query]]
=== Query API

챗봇에 질의를 하고 그에 대한 응답을 반환함.

operation::query[snippets='request-parameters,response-body,response-fields']Swagger
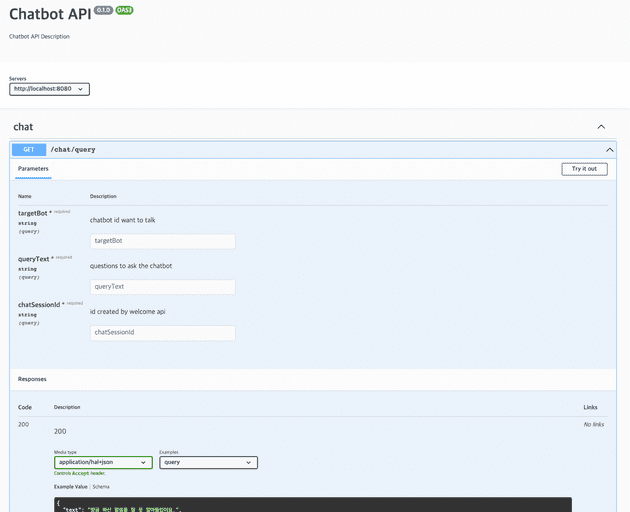
Swagger는 API를 설명하는 하나의 표준인 OAS(Open API Specification)를 따라 이를 시각화해주는 도구이다. 스프링 진영에서는 이를 자동화하는 도구로 ‘springfox’ 또는 ‘springdoc’을 많이 사용한다. springfox가 몇 년간 업데이트가 없으면서 springdoc으로 많이 넘어갔으나, 요즘 다시 업데이트하고 있는 것으로 보인다.
dependencies {
  ...
  implementation 'org.springdoc:springdoc-openapi-ui:1.6.6'
}@Operation(summary = "Query API", description = "챗봇에 질의를 하고 그에 대한 응답을 반환함.")
@ApiResponses({
@ApiResponse(responseCode = "200", description = "OK"),
})
@GetMapping("/query")
public ResponseEntity<EntityModel<ResultMessage>> chatQuery(
...
return ret;
}간단하게 의존성을 추가하고 어노테이션을 정의하는 것만으로 화면을 구성할 수 있다. 이처럼 Swagger는 초기 설정이나 사용법이 비교적 더 간단하며 UI에서 제공하는 기능 자체도 풍부하다.
하지만 단점도 존재한다. 문서화를 위한 각종 어노테이션들이 코드에 포함되어 가독성을 해친다는 점이며, 또한 이렇게 문서화된 결과가 실제 API 스펙과 일치한다는 보장이 없다는 것이다.
Spring Rest Docs + Swagger UI
Spring Rest Docs에서는 기본적으로 adoc 파일을 생성하지만, OAS으로 추출해주는 오픈 소스가 존재한다. 그리고 이렇게 생성된 파일을 기반으로 swagger UI로 보여줄 수 있다.
plugins {
  // Rest Docs > Open API Specification
  id 'com.epages.restdocs-api-spec' version '0.15.3'
  // Swagger
  id 'org.hidetake.swagger.generator' version '2.18.2'
}

dependencies {
  testImplementation 'com.epages:restdocs-api-spec-mockmvc:0.15.2'
  swaggerUI 'org.webjars:swagger-ui:4.5.0'
}

openapi3 {
  server = 'http://localhost:8080'
  title = 'Chatbot API'
  description = 'Chatbot API Description'
  version = '0.1.0'
  format = 'yaml'
}

generateSwaggerUI {
  inputFile = file("${project.buildDir}/api-spec/openapi3.yaml")
  dependsOn 'openapi3'
}

bootJar {
  dependsOn generateSwaggerUI

  from("${generateSwaggerUI.outputDir}") {
      into 'static/docs/swagger-ui'
  }
}
이 때 테스트 코드 작성 시 document() 메서드는 org.springframework.restdocs.mockmvc가 아니라 com.epages.restdocs.apispec에 정의된 것을 사용해야 한다.
openapi3 태스크가 실행되면 아래와 같이 OAS를 준수하는 yml파일이 생성된다. 그리고 이를 기반으로 generateSwaggerUI 태스크는 swagger-ui를 생성해준다.
openapi: 3.0.1
info:
  title: Chatbot API
  description: Chatbot API Description
  version: 0.1.0
servers:
- url: http://localhost:8080
tags: []
paths:
  /chat/query:
    get:
      tags:
      - chat
      operationId: query
      parameters:
      - name: targetBot
        in: query
        description: chatbot id want to talk
        required: true
        schema:
          type: string
      - name: queryText
        in: query
        description: questions to ask the chatbot
        required: true
        schema:
          type: string
      - name: chatSessionId
        in: query
        description: id created by welcome api
        required: true
        schema:
          type: string
      responses:
        "200":
          description: "200"
          headers:
            Content-Type:
              description: response content type
              schema:
                type: string
          content:
            application/hal+json:
              schema:
                $ref: '#/components/schemas/chat-welcome2084107755'
              examples:
                query:
                  value: "{\n  \"text\" : \"방금 하신 말씀을 잘 못 알아들었어요.\",\n  \"_links\"\
                    \ : {\n    \"query\" : {\n      \"href\" : \"http://localhost:8080/chat/query\"\
                    \n    }\n  }\n}"
  /chat/welcome:
    get:
      tags:
      - chat
      operationId: welcome
      parameters:
      - name: targetBot
        in: query
        description: chatbot id want to talk
        required: true
        schema:
          type: string
      responses:
        "200":
          description: "200"
          headers:
            CHAT-SESSION-ID:
              description: session value for chat
              schema:
                type: string
            Content-Type:
              description: response content type
              schema:
                type: string
          content:
            application/hal+json:
              schema:
                $ref: '#/components/schemas/chat-welcome2084107755'
              examples:
                welcome:
                  value: "{\n  \"text\" : \"안녕하세요!\",\n  \"_links\" : {\n    \"query\"\
                    \ : {\n      \"href\" : \"http://localhost:8080/chat/query\"\n\
                    \    }\n  }\n}"
components:
  schemas:
    chat-welcome2084107755:
      type: object
      properties:
        _links:
          type: object
          properties:
            query:
              type: object
              properties:
                href:
                  type: string
                  description: chat query link after welcome
        text:
          type: string
          description: answer of chatbot
참고


